

Hayabusa Scanner Menu
Streamlining Windows Event Log Analysis with My Hayabusa Scanner Menu Tool
For many DFIR analysts, hunting through Windows event logs (.evtx files) is a daily reality. While Hayabusa is already a powerful and fast timeline generator for Windows event logs, I wanted to make it easier for investigators to quickly point the tool at evidence folders or mounted images — without needing to remember the full command-line syntax every time.
That’s why I built the Hayabusa Scanner Menu Tool, a Python-based helper script that provides an interactive menu for running Hayabusa scans. The project is available here:
👉 dfirvault/Hayabusa-scanner-menu
Why I Built This
During investigations, I often deal with folders full of .evtx logs collected from compromised systems or forensic images. Running Hayabusa manually is straightforward, but repetitive — especially when juggling multiple case folders, output formats, and naming conventions.
This tool solves that by:
Providing a menu-driven interface (no need to remember command flags).
Supporting folder selection via a GUI dialog.
Automatically searching for
.evtxfiles (even in subdirectories).Generating both CSV timelines and HTML reports in one run.
Enforcing a consistent naming convention for output files (
YYYYMMDD-FolderName-CaseName).Saving configuration for the Hayabusa executable, so you don’t need to re-select it each time.
Key Features
🔹 Simple Menu Navigation
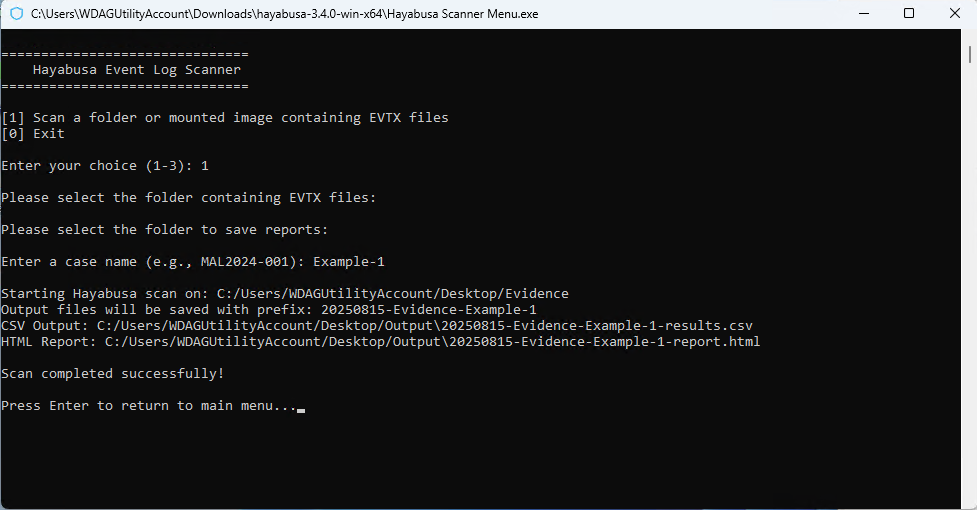
When you launch the script, you’re presented with a clean menu:
Hayabusa Event Log Scanner
===============================
[1] Scan a folder or mounted image containing EVTX files
[0] Exit
This makes it easy to pick an analysis path without memorizing flags.
🔹 Smart EVTX File Detection
If you point the tool at a folder without EVTX files, it will ask whether to search subfolders and list any directories that contain logs, giving you flexibility to choose one or scan them all.
🔹 Case-Aware Output
Each scan prompts for a case name (e.g., MAL2024-001). Combined with the folder name and current date, this ensures your output files are consistently named:
20250820-Workstation01-MAL2024-001-results.csv20250820-Workstation01-MAL2024-001-report.html20250820-Workstation01-MAL2024-001-log.txt
This keeps results organized and easy to trace back to their source.
🔹 Dual Output (CSV + HTML)
By default, the tool tells Hayabusa to generate both:
A CSV timeline for deep analysis in tools like Excel or Splunk.
A ready-to-view HTML report for quick triage.
Both are stored in your chosen output folder.
🔹 Windows Integration
Built-in support for file/folder selection dialogs (via Tkinter).
Automatic opening of the output directory in Windows Explorer when the scan completes.
Optional (commented) admin privilege escalation for scenarios where elevated rights are needed.
Example Workflow
Launch the script:
python hayabusa_scanner_menu.pyOr simply double click the .exehayabusa_scanner_menu.exeSelect your EVTX folder (from a live system dump, forensic image, or collection).
Enter your case name.
Pick an output location for reports.
Let the tool run Hayabusa and generate both CSV + HTML results.
Review the HTML report immediately, or ingest the CSV into your preferred analysis tool.
Where to Get It
The tool is open-source and available on GitHub:
👉 https://github.com/dfirvault/Hayabusa-scanner-menu
Feel free to try it out, suggest improvements, or fork it for your own workflows. Contributions are always welcome.
Final Thoughts
This project is meant to reduce friction when running Hayabusa in real-world investigations. By combining a menu-driven interface, GUI dialogs, and standardized output naming, it allows DFIR practitioners to focus on analysis rather than setup.
If you’re using Hayabusa regularly in your workflow, I think this tool will save you time and keep your cases more organized.